Chatbots have taken hold by now thanks to the increasingly popular ChatGPT. These existed before, however, although their answers were very limited both in terms of the fluency of the text returned and their limited knowledge. To this day we have all used ChatGPT for any question, even the silliest. But what if we wanted to have our own chatbot responding on our data? This is where the discussion gets more interesting. In fact, although ChatGPT has a really vast knowledge thanks to the data it was built on (practically the whole web) there are definitely some topics it doesn’t know about.
For example, if you are a company you will have private documents or internal regulations that have never been published on the web. At this point you want to extract some information from these resources. How can you do this? In this case we will have to build a chatbot that uses those documents as a knowledge resource, but relies on natural language generation models to provide sensible and smooth responses.
There are several natural language generation models (LLMs) including ChatGPT’s. However, if we do not want to spend money and practice on small data, we can use some free models. These definitely do not have the performance of ChatGPT but can be a great starting point for developing our own chatbot. Among the free LLMs, Zephyr 7B Alpha from HuggingFace stands out, along with Mistral 7B Instruct and Llama-2 7B Chat. What sets Zephyr 7B Alpha apart is its unique approach to tuning through Direct Preference Optimization (DPO) (instead of RLHF), outperforming even the 10-times larger Llama-2 70B model on MT-Bench, a conversational performance evaluation benchmark.
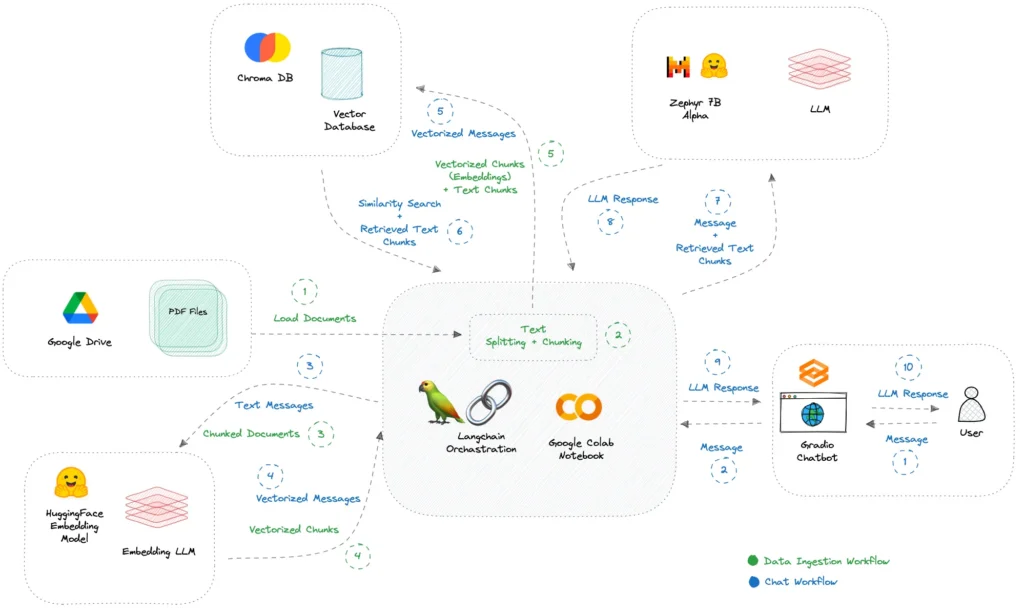
In this article, we will see the step-by-step process of creating a conversational chatbot using Zephyr 7B Alpha, Google Colab, ChromaDB, Langchain, and Gradio. This way, you will be able to effortlessly upload PDF files from Google Drive and start conversations using the power of a free Google Colab (GPU T4) and a Gradio chat interface. Here are the steps to follow.
1. Initialize the working environment
To begin, you need to install the necessary Python packages using pip.
					#install required packages
!pip install -q transformers peft  accelerate bitsandbytes safetensors sentencepiece streamlit chromadb langchain sentence-transformers gradio pypdf
To avoid character encoding problems we suggest to set it to UTF-8.
					# fixing unicode error in google colab
import locale
locale.getpreferredencoding = lambda: "UTF-8"
Finally, we need to import all the necessary libraries. In particular, we will use Gradio, which allows us to create simple and friendly web interfaces, all of which can be conveniently integrated with Colab. We will also use langchain to capture information from pdf documents and transformers to help us in generating our model.
					# import dependencies
import torch
from transformers import AutoModelForCausalLM, AutoTokenizer, BitsAndBytesConfig, pipeline

import os
import gradio as gr
from google.colab import drive

import chromadb
from langchain.llms import HuggingFacePipeline
from langchain.document_loaders import TextLoader
from langchain.text_splitter import RecursiveCharacterTextSplitter
from langchain.embeddings import HuggingFaceEmbeddings
from langchain.vectorstores import Chroma
from langchain import HuggingFacePipeline
from langchain.document_loaders import PyPDFDirectoryLoader
from langchain.chains import ConversationalRetrievalChain
from langchain.memory import ConversationBufferMemory
2. Use the model from HuggingFace
As mentioned earlier we will not use paid templates but a free one. Therefore, we need to download the Zephyr-7B-Alpha model. We will use the sharded version, which consumes about 5 GB of RAM on the free Google Colab notebook, ensuring smooth operation without memory constraints. This process typically takes 5 to 10 minutes when using the T4 GPU. In the code below I also leave some other models that can be used instead of the one proposed.
					# specify model huggingface mode name
model_name = "anakin87/zephyr-7b-alpha-sharded"

###### other models:
# "Trelis/Llama-2-7b-chat-hf-sharded-bf16"
# "bn22/Mistral-7B-Instruct-v0.1-sharded"
# "HuggingFaceH4/zephyr-7b-beta"
At this point we define some functions that we will need to load the selected model. The first function helps us load the selected model in the 4-bit version.
					# function for loading 4-bit quantized model
def load_quantized_model(model_name: str):
    """
    :param model_name: Name or path of the model to be loaded.
    :return: Loaded quantized model.
    """
    bnb_config = BitsAndBytesConfig(
        load_in_4bit=True,
        bnb_4bit_use_double_quant=True,
        bnb_4bit_quant_type="nf4",
        bnb_4bit_compute_dtype=torch.bfloat16
    )

    model = AutoModelForCausalLM.from_pretrained(
        model_name,
        torch_dtype=torch.bfloat16,
        quantization_config=bnb_config
    )
    return model
Next we define a function to handle the tokenizer.
					# fucntion for initializing tokenizer
def initialize_tokenizer(model_name: str):
    """
    Initialize the tokenizer with the specified model_name.

    :param model_name: Name or path of the model for tokenizer initialization.
    :return: Initialized tokenizer.
    """
    tokenizer = AutoTokenizer.from_pretrained(model_name)
    tokenizer.bos_token_id = 1  # Set beginning of sentence token id
    return tokenizer
At this point we can load the model and initialize the tokenizer based on the selected model.
					# load model
model = load_quantized_model(model_name)

# initialize tokenizer
tokenizer = initialize_tokenizer(model_name)

# specify stop token ids
stop_token_ids = [0]
3. Upload documents
To upload the documents of our interest, which the chatbot will rely on for our responses, we need to connect Google Drive to Google Colab. Suppose we have uploaded the PDF files we wish to interact with to a folder (e.g., documents_colab) in Google Drive. To establish a connection between Google Drive and Google Colab we use the following code.
					# mount google drive and specify folder path
drive.mount('/content/drive')
folder_path = '/content/drive/MyDrive/documents_colab/'
Running this code will prompt you to grant permission to access documents in your gmail account. Follow the step-by-step screens as they are shown to grant all necessary permissions.

4. Include documents in the vector database
Now that documents are accessible in Google Colab, you can upload them and segment them into smaller pieces of text. We will use the Chroma DB vector database to save our documents. Using some tools HuggingFace Embeddings and Langchain we will appropriately prepare our documents to be hosted within our database. Here is the code to upload our PDF files.
					# load pdf files
loader = PyPDFDirectoryLoader(folder_path)
documents = loader.load()

# split the documents in small chunks
text_splitter = RecursiveCharacterTextSplitter(chunk_size=1000, chunk_overlap=100) #Chage the chunk_size and chunk_overlap as needed
all_splits = text_splitter.split_documents(documents)

# specify embedding model (using huggingface sentence transformer)
embedding_model_name = "sentence-transformers/all-mpnet-base-v2"
model_kwargs = {"device": "cuda"}
embeddings = HuggingFaceEmbeddings(model_name=embedding_model_name, model_kwargs=model_kwargs)

#embed document chunks
vectordb = Chroma.from_documents(documents=all_splits, embedding=embeddings, persist_directory="chroma_db")

# specify the retriever
retriever = vectordb.as_retriever()
5. Building a RAG (Retrieval Augmented Generation) pipeline.
Now that we have included our documents in the vector database, it is time to build a RAG pipeline using HuggingFace and Langchain. We then define the pipeline to be used and define a function to handle the conversations we are going to have with the chatbot.
					# build huggingface pipeline for using zephyr-7b-alpha
pipeline = pipeline(
        "text-generation",
        model=model,
        tokenizer=tokenizer,
        use_cache=True,
        device_map="auto",
        max_length=2048,
        do_sample=True,
        top_k=5,
        num_return_sequences=1,
        eos_token_id=tokenizer.eos_token_id,
        pad_token_id=tokenizer.eos_token_id,
)

# specify the llm
llm = HuggingFacePipeline(pipeline=pipeline)

# build conversational retrieval chain with memory (rag) using langchain
def create_conversation(query: str, chat_history: list) -> tuple:
    try:

        memory = ConversationBufferMemory(
            memory_key='chat_history',
            return_messages=False
        )
        qa_chain = ConversationalRetrievalChain.from_llm(
            llm=llm,
            retriever=retriever,
            memory=memory,
            get_chat_history=lambda h: h,
        )

        result = qa_chain({'question': query, 'chat_history': chat_history})
        chat_history.append((query, result['answer']))
        return '', chat_history

    except Exception as e:
        chat_history.append((query, e))
        return '', chat_history
6. Create the user interface
All that remains for us to do at this point is to build a user interface to interact with our chatbot. In Gradio there is already a block dedicated to the chatbot to which we add a textbox to enter our request and a button to cancel the conversation.
					# build gradio ui
with gr.Blocks() as demo:

    chatbot = gr.Chatbot(label='Chat with your data (Zephyr 7B Alpha)')
    msg = gr.Textbox()
    clear = gr.ClearButton([msg, chatbot])

    msg.submit(create_conversation, [msg, chatbot], [msg, chatbot])

demo.launch()
Once you run the code you will get a link that will allow you to access your chatbot in a new browser tab. You will still be able to interact with the interface in the Colab notebook as well. Below is an example of the interaction that was done (consider that the documents was on the NoSQL databases).

Conclusions
Congratulations! You now have a fully private AI chatbot up and running on your Google Colab notebook, without the data leaving the notebook environment.
Although the responses are not always perfect, they skillfully extract and abstract information from the context provided. This approach offers a significant advantage, allowing us to explore large amounts of textual data at no cost, while maintaining and ensuring the privacy of our information.
However, it is essential to recognize some limitations of this solution:
- The model may produce hallucinated responses when presented with domain-specific vocabulary.
- Response times can range from 15 to 30 seconds, sometimes more.


