WordPress is the platform that allows you to manage various contents. As we have already seen in the articles that deal with this software, you can manage blog articles, landing pages for the sale of services up to manage an e-commerce. Through different plugins we can add the functionality that our site should have.
Since WordPress was born for the creation of blogs, its system is based on a few tables that manage the content of posts and the various options. To integrate new functionalities without upsetting the structure of the starting database, custom fields have been added. These fields allow to save additional information related to the objects managed by WordPress (posts, pages and media). In fact, I remind you that even an e-commerce product is “seen” by WordPress as a post!
In this article we’ll see how to create them quickly and easily and finally how to integrate them within our plugin.
Why are custom fields useful?
Before we see how to use them, we need to understand the importance of these fields.
Most plugins use custom fields to track the information behind their operation. For example, Woocommerce leverages these fields to save product characteristics such as color, weight, and information to manage the sale such as price and number of available products.
So, using them allows us to structure the information we want to track. Their management, insertion and updating, becomes simple and consistent. In this way, all objects will have the possibility of having associated this information, which can then be visualized in the templates.
How to insert custom fields in WordPress?
Unlike what we have seen in other articles, managing custom fields does not necessarily require programming knowledge. In this article we will cover the basic functionality of WordPress and the use of the Advanced Custom Fields plugin. Finally, we will see how to integrate the latter into our plugin.
Let’s start with the basic functionality of WordPress. To enable the insertion of custom fields, simply select the corresponding item in the Options menu of the new block editor.
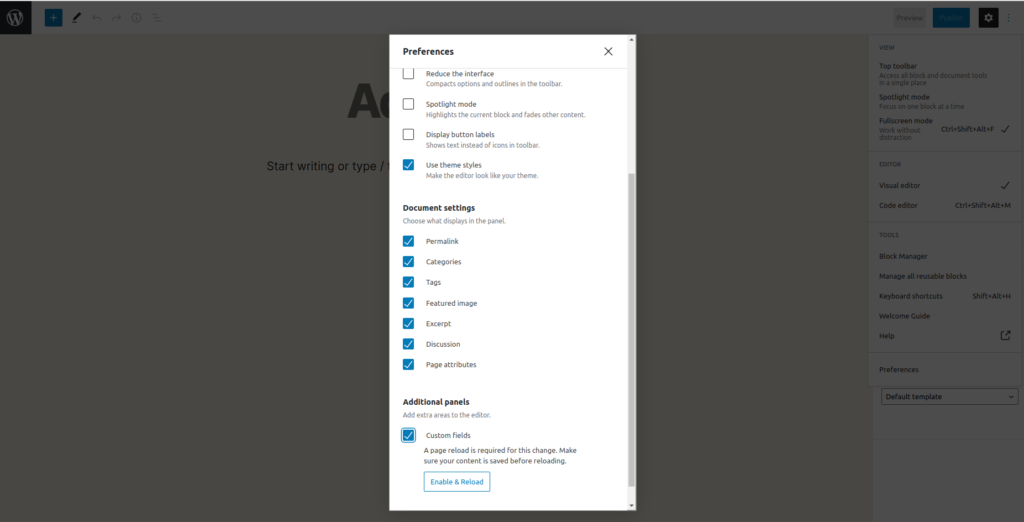
Once enabled an editor will appear below the article content to add custom fields.

As you can see, their management is a simple key-value association. There is no possibility to properly manage the types of values that can be saved. Therefore, it requires some accuracy from the one who will insert the data. For this reason, and not only, many use the Advanced Custom Fields plugin. Let’s discover its features to understand the secret of its success.
Il plugin Advanced Custom Fields
First of all, let’s specify that this plugin is of the fremium type. This means that there is a free and a paid version. We will use the free version in this tutorial because it is more than enough. The paid version offers extra features oriented to those who need to develop complex websites.
The paid version allows in addition to the basic functionality:
- repetition of fields
- creation of blocks based on custom fields to be integrated into templates
- customizing the display of fields
- management of image galleries
- cloning fields
You can find pricing here. Currently, prices start at a cost of $49 per year for a single site up to $249 per year for web agencies.
But why should we use this plugin compared to the basic version provided by WordPress? The answer is simple: this plugin simplifies the interface for adding and managing custom fields in the WordPress dashboard, but also displaying information from custom fields in the frontend.
Its usefulness, and consequently its success, can be seen with an average rating of 4.9 stars out of 5 resulting from over 1000 reviews and more than 1 million active installations. Let’s see how to use it on a real case.
Our case study is the management of a travel blog. We want to create some fields to track some information to share in articles.
The data we want to save is as follows:
- Destination: the place visited.
- Purpose: suppose we have two different types of travel: ” business ” and ” pleasure”.
- Start date: when you left.
- End Date: when you returned from your trip.
- Number of travelers: how many people who left with us.
In this tutorial we will insert 5 custom fields using this plugin. Following the steps shown in this example you will be able to replay them in your sites. We will then see how to create the fields and how to insert them into the frontend. But we won’t stop there. We will also see how to integrate them into our plugin that we have developed in articles Develop a WordPress plugin – create the initial structure and Create a settings page for a WordPress plugin.
Add a group of custom fields
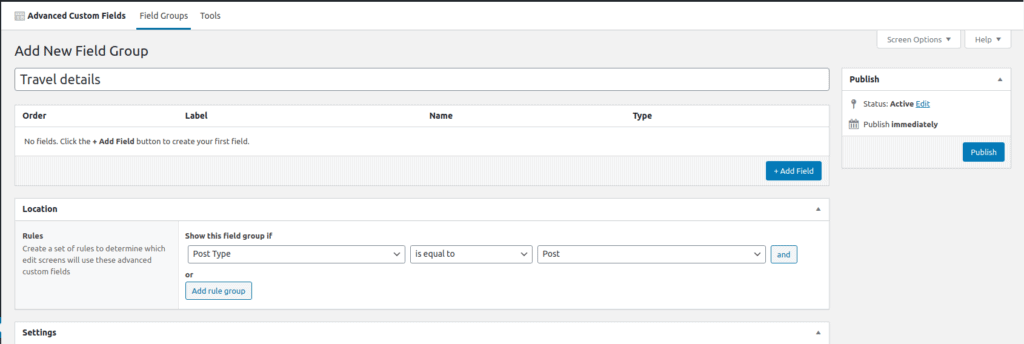
Once the plugin is installed and activated select Custom Fields > Field Groups in the side menu. To add a new group, click on Add New. The fields that will belong to this group will be displayed together in the WordPress dashboard.
In our example we will create a single group containing the 5 items described above. We will assign the name Travel details to the group. In the Location section we define where this group will be displayed. You can decide to display it only in the pages related to the post and/or article type items. If you have Woocommerce installed, you can also associate them to products, orders and/or coupons. In our example we will display it only in the posts.
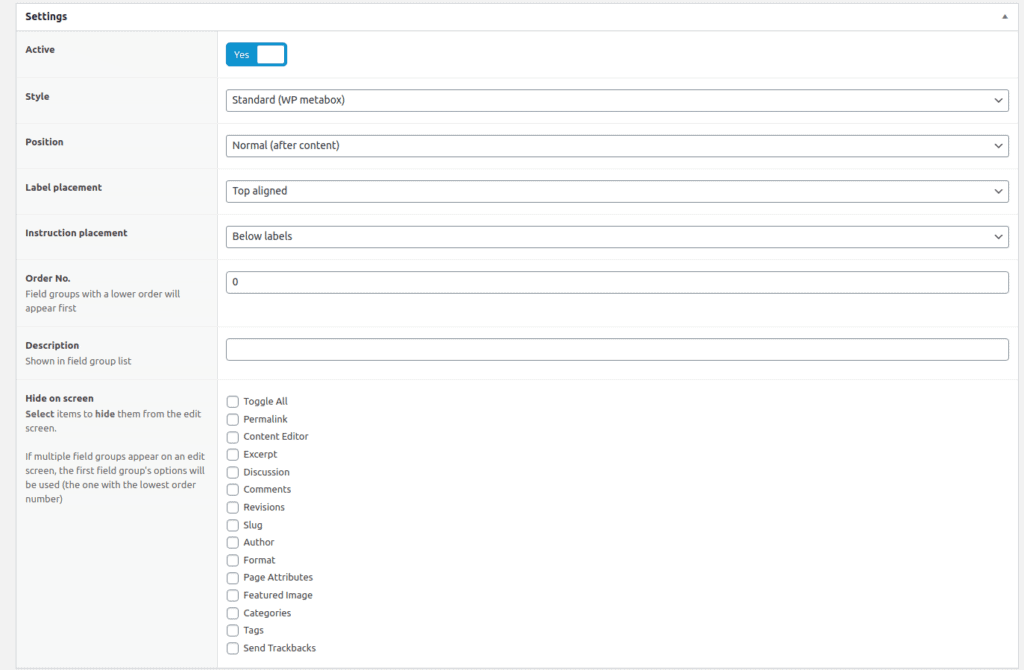
In the Settings section you can instead decide the display options. In the example we leave the default ones, but you can play with the settings to improve the user experience of your dashboard.
Add custom fields
Once the group options have been set we can add the fields of our interest by clicking on the + Add Field button. A form with several fields will appear. In the figure below you can see the form filled in for the Destination (Location) field.
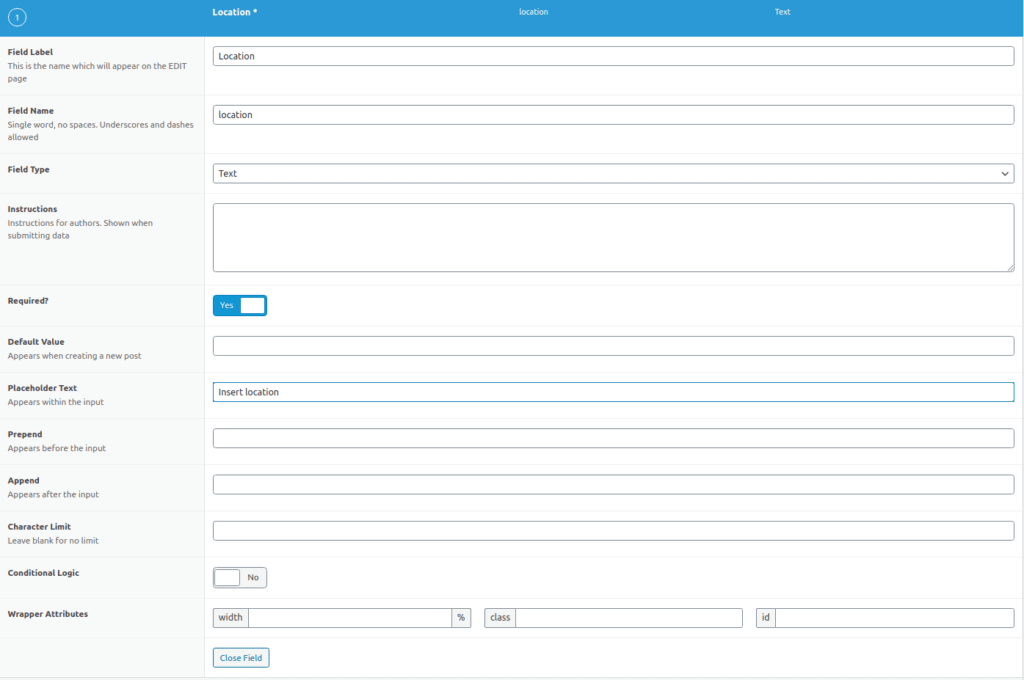
The destination field is just text so it is very simple. Let’s see an example of a more articulated field such as the Purpose of the trip. In this case we want there to be only 2 options available and the user cannot enter arbitrary values. We will need a radio button to list the available options.
In the Field Type section, select Choice > Radio Button. The field tab will change from the previous one allowing us to enter the available choices. We can also set, for example, the layout, if the field is mandatory and the default value.
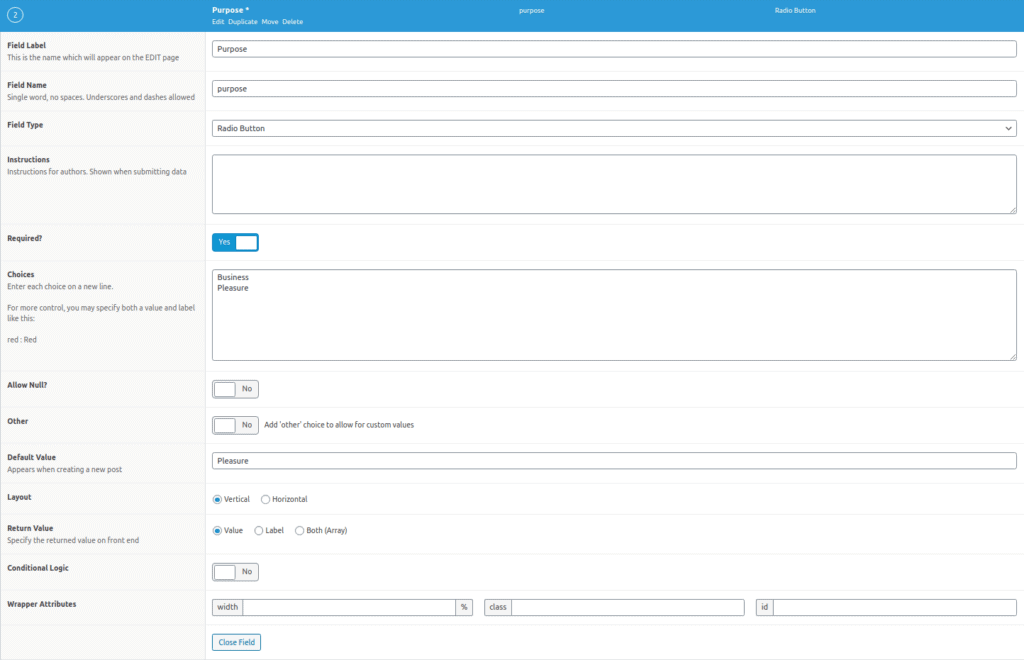
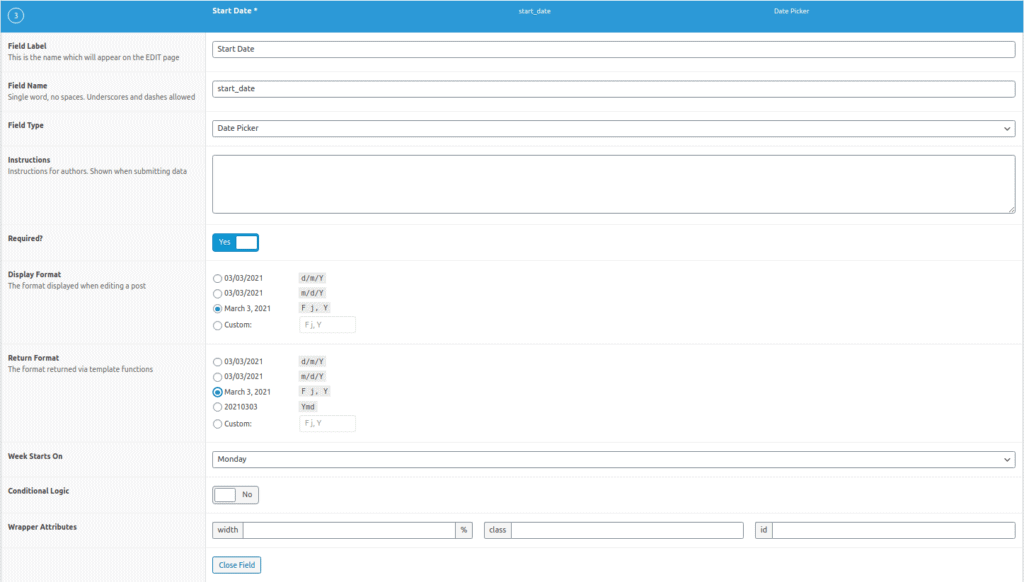
The field tab changes depending on the type of data you want to track. For example, for the date field we can choose the display format and the returned format, as well as the day the week starts.
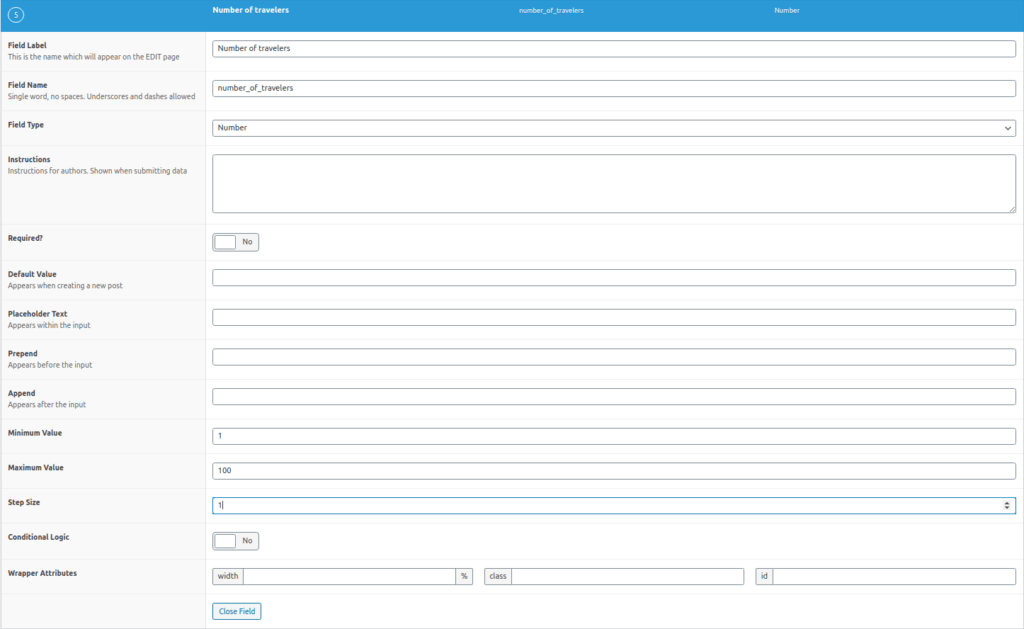
On the other hand, if we insert a numeric field we can define the minimum and maximum value and the possible increments.
By repeating the procedure for each field in our example, the final situation will be as shown below. You can see that the required fields are marked with the * symbol in red.

Conditional logic
A very useful feature provided by this plugin is the ability to display a field if certain conditions occur.
Returning to our example, think you want to save the number of travelers if and only if the trip was not for work. Therefore, just select the Conditional Logic button to bring up a section to define the display conditions.
We will insert a condition that if the value of the Purpose field is different from Business then the field will be displayed.

Displaying custom fields in the frontend
At this point we have defined the fields we need for our site. The question that arises is: How do I display them in my pages?
In fact, if you try to write a post and enter all the fields, they won’t show up anywhere except the WordPress dashboard.
There are mainly 3 alternatives to resolve this.
- Update the template of your theme
- Use a shortcode
- Use Elementor Pro
The first option requires technical knowledge and is more invasive. You have to intervene in the php files of your theme. There is a real risk of inserting errors that could affect the rendering and the functioning of the site. Moreover, you have to be careful during the theme updates. In fact, if you don’t create a child theme you might lose your modifications during the installation of the new theme version. Finally, if for some reason you want to change the theme, you should repeat all the work done.
The second option is super simple and, in my opinion, very convenient if you simply want to enter the data of custom fields time after time. However, it requires a lot more work because you’ll have to remember to add the shortcodes in each post. The shortcodes are provided directly by the plugin and can be called within your pages simply with the following syntax
[acf field="FIELD_NAME"] The last option allows you not to work with PHP but only with Elementor Pro templates. Unfortunately, you will be bound to use Elementor as an editor for your site and pay for the license.
Integrating Advanced Custom Fields into a Plugin
As we have seen, this plugin handles very well custom fields that we can associate with any resource on our site. Their use is not only limited to saving some data in a structured way and displaying them. We can, in fact, use them also in our plugins to add, for example, features to the products of an e-commerce site or information to our posts. Based on these data, provided by the user, our plugin will perform some operations. Let’s see how to integrate it!
To include Advanced Custom Field in our plugin, you need to download the zip file containing the source code. We suggest you to extract the zipper into includes folder and name it acf.
At this point we need to insert the following code in the main plugin file. Following the structure described in the article Develop a WordPress plugin – create the initial structure, we will insert these lines of code in the flowygo.php file.
// Define path and URL to the ACF plugin.
define( 'MY_ACF_PATH', get_stylesheet_directory() . '/includes/acf/' );
define( 'MY_ACF_URL', get_stylesheet_directory_uri() . '/includes/acf/' );

// Include the ACF plugin.
include_once( MY_ACF_PATH . 'acf.php' );

// Customize the url setting to fix incorrect asset URLs.
add_filter('acf/settings/url', 'my_acf_settings_url');
function my_acf_settings_url( $url ) {
    return MY_ACF_URL;
}

// (Optional) Hide the ACF admin menu item.
add_filter('acf/settings/show_admin', 'my_acf_settings_show_admin');
function my_acf_settings_show_admin( $show_admin ) {
    return false;
}
To display the administration part of the custom fields just modify the my_acf_settings_show_admin function by returning the value true.
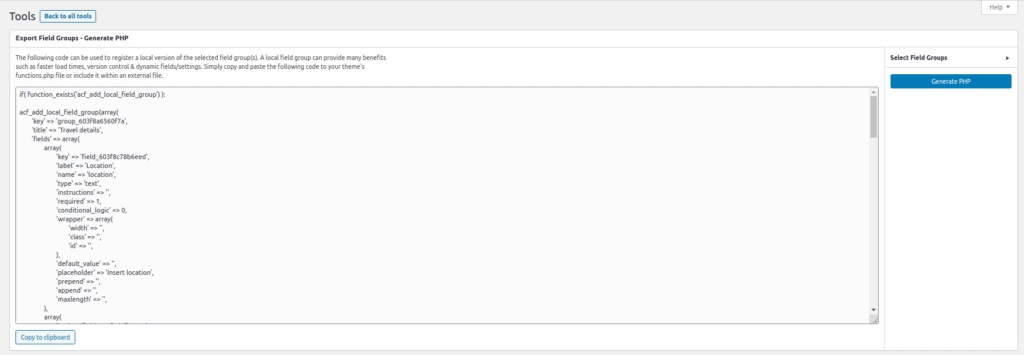
To include the fields we have previously generated we can use the export tools that the Advanced Custom Fields plugin provides. Going in the Tools section we can export a json file or directly the php code that generates them.

If we choose the php generation option we can copy the code directly in a function that we will insert in the file class-flowygo-admin.php. We will call this function flowygo_acf_add_local_field_groups.
To activate them you have to call the acf init action in the define_admin_hooks function defined in the class-flowygo.php file in the admin folder. The code to insert is the following.
$this->loader->add_action( 'acf/init', $plugin_admin, 'flowygo_acf_add_local_field_groups'); In this way, when the plugin is activated, custom fields will be added according to the defined rules. We can, for example, retrieve the fields associated with a post simply by using the get_post_meta function of WordPress. According to their value the logic of our plugin will perform certain operations.


