WordPress is the most widely used platform for creating websites worldwide. In fact, it is possible to create a site like this one you are visiting that includes pages describing a business and articles for a blog. Born primarily to allow any person to create and manage their own blog on which to publish their interests, over the years the platform has evolved. Today, in addition to being used for blogs, it is also used to create e-commerce or e-learning sites. But how is it possible to add these features to a basic WordPress installation? Simple: look for the plugin that is right for you!!!
Plugins are software packages that integrate with the WordPress platform to include new features. For example, Woocommerce allows you to create a virtual store, manage product inventory, set up payment and shipping methods and much more. So with a few clicks and a bit of configuration an e-commerce site is ready to be launched.
Nowadays there are a variety of plugins for every need. However, there are special needs that are not covered by the plugins currently available. For example, the creation of customized pages for the provision of services. In these cases it is necessary to implement a dedicated plugin.
Implementing a WordPress plugin, unfortunately, is not for everyone. You need to have some programming skills, know the PHP language, some html and css, and study the functionality provided by WordPress. Unfortunately the documentation provided by WordPress doesn’t provide concrete examples, which makes the development of a plugin very difficult. In this article we are going to see how to create the code structure for a new plugin and analyze it.
Setting up a development environment
Before starting to create our plugin we need to create an environment where we can test it. We don’t want to install our plugin on an already online site risking to compromise some of its functionalities.
To do this the advice is to create a docker that implements WordPress. We can use the example already described in the article Docker compose – how to orchestrate different containers. In this way we will have on our PC a “clean” installation of WordPress on which we can work and experiment. For simplicity we bring you the docker-compose file below.
version: '3.3'

services:
   db:
     image: mysql:5.7
     volumes:
       - db_data:/var/lib/mysql
     restart: always
     environment:
       MYSQL_ROOT_PASSWORD: somewordpress
       MYSQL_DATABASE: wordpress
       MYSQL_USER: wordpress
       MYSQL_PASSWORD: wordpress

   wordpress:
     depends_on:
       - db
     image: wordpress:latest
     ports:
       - "8000:80"
     restart: always
     environment:
       WORDPRESS_DB_HOST: db:3306
       WORDPRESS_DB_USER: wordpress
       WORDPRESS_DB_PASSWORD: wordpress
       WORDPRESS_DB_NAME: wordpress
volumes:
    db_data: {}
Our test site will be available at http://localhost:8000. We will have to connect to this address and start the configuration of WordPress. Since it is a test site we don’t need to install all the plugins that we will actually use for the final site, but only the strictly necessary ones.
For instance, if our plugin will insert custom pages in the user profile of an e-commerce site, we will necessarily need to install Woocommerce. Similar thing if the new plugin will insert new features in a graphical editor like Elementor, DiVi or Avada.
Remember that the more plugins you install the slower your site will be and the interference with your plugin may increase.
Create the structure of a WordPress plugin
As mentioned before, the documentation related to the development of WordPress plugins does not provide tutorials, but only guidelines. It is therefore difficult to define a standard structure that respects the best practices reported in the official documentation.
There are, in fact, plugins consisting of a single file like Hello Dolly, or others very complex like Woocommerce. The structure reflects both the functionality provided and the capabilities of the programmer.
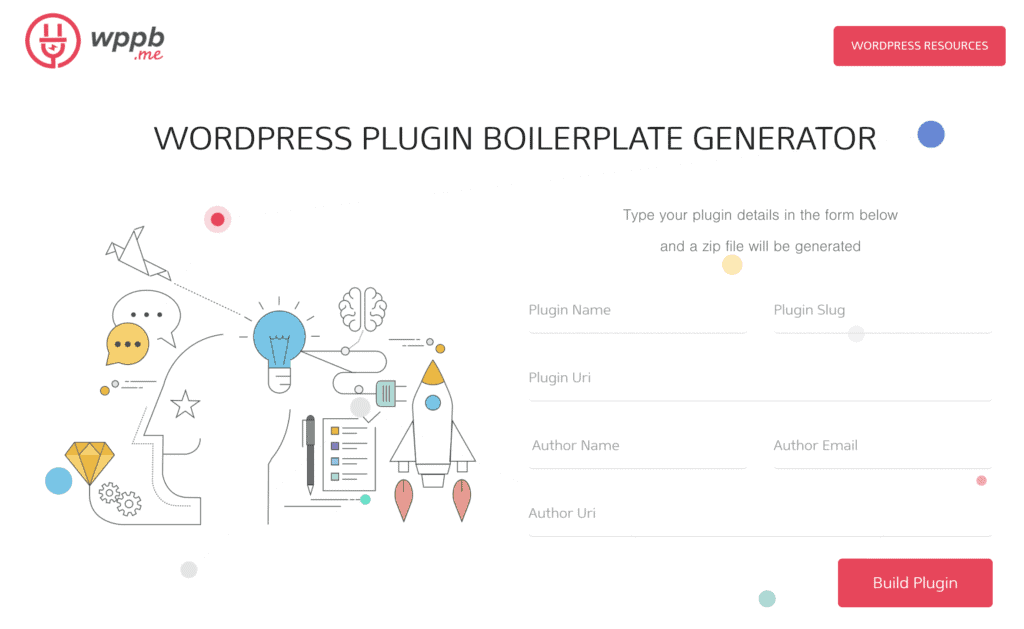
However, there is a solution to this lack of standardization of plugins structures: WordPress Plugin Boilerplate Generator. With this software it is possible to generate a standard structure of new plugins that reflects the best practices. Being online there is no need to install anything on our pc. Just fill in the form shown below.

Once filled the form and clicked on the “Build Plugin” button, a zipper containing the code of our new plugin will be downloaded. Obviously it will be up to the programmer to implement the new features. The structure, however, will allow us to insert them in an easy and optimal way. Moreover, all the information and the functionality of installation and uninstallation of the plugin are already available. Therefore, we can try to install it without the fear that it could compromise the site functioning.
Plugin structure
Let’s see the structure of the plugin to understand where the various functionalities will be inserted. Let’s create with the software described above the plugin with the following information:
- Name: flowygo wp
- Slug: flowygo
- Uri: https://github.com/alefiori82
- Author name: Alessandro Fiori
- Author email: [email protected]
- Author Uri: https://flowygo.com/
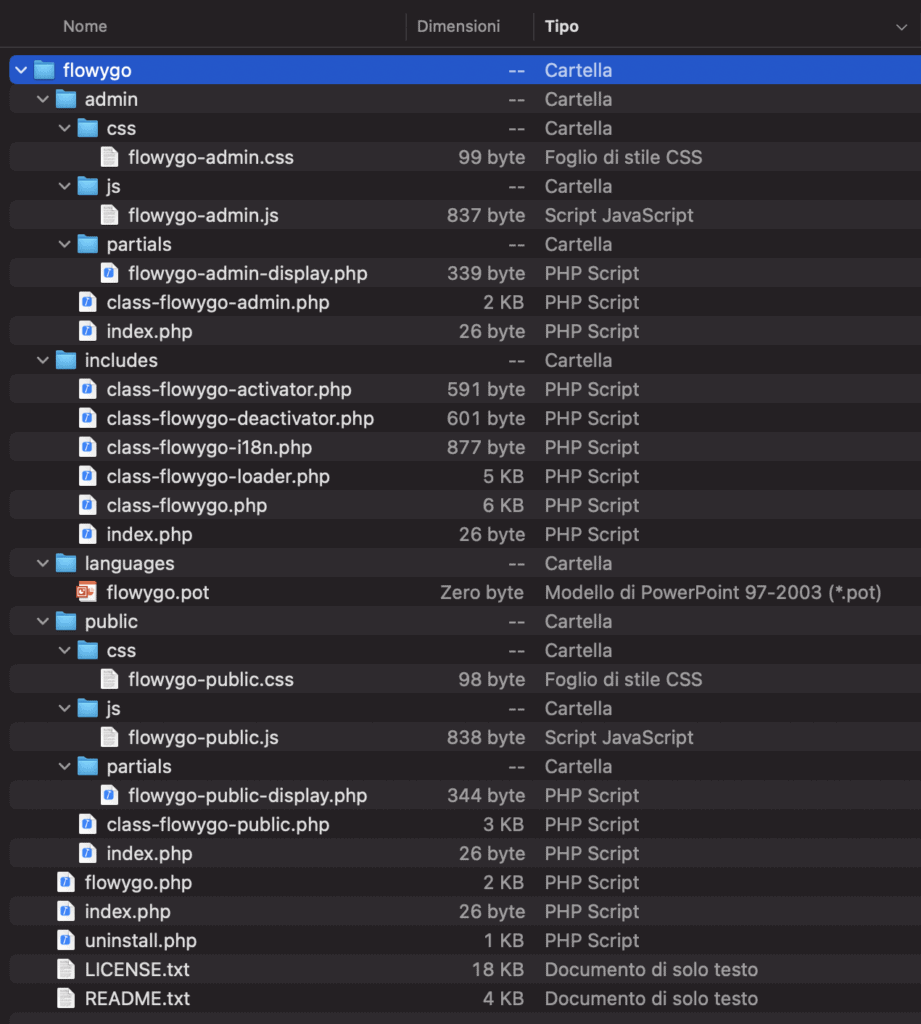
In a few seconds a zipper of about 21 KB will be downloaded. Let’s extract its contents to work with it. The resulting folder will have the following structure.

The structure is quite articulated but it includes everything we need, and maybe a little bit more. Let’s analyze it to highlight the main features that will help us to develop our plugin.
First of all we can notice that a README and LICENSE file are already present. The generated license is of the type “GNU GENERAL PUBLIC LICENSE“. In case you need to change it, simply replace the content of this file. In the README file there is some information about the plugin. Some of this information will be displayed in the plugins panel of the site administrator. So change them before releasing your plugin!!!
Although it seems more intuitive that the index.php file is the one that manages the whole plugin, this is not true. All the index.php files you find in the various folders are used to define the “packages” or “modules” of your software. If you come like me from the python world you could compare them to the __init__.py file.
The file that defines the plugin and that will be executed by WordPress during installation, configuration, execution and uninstallation is the flowygo.php file. In this file you will have to define the dependencies and inclusions that you will need. For example, you can insert a function that checks for the presence of certain active plugins.
The includes folder contains the files related to the management of the basic functionality of the plugin. The file we will have to modify to activate the new features is class-flowygo.php. Inside this file we will add, for example, actions to register new menus in the admin panel, endpoints and include scripts.
The functionalities our plugin will provide will be defined in the files of the admin and public folders. The admin folder will include all php, js and css files that will be used in the administration panel menus. It will be here that we can define forms to set parameters of our plugin or intercept actions made by other plugins. On the other hand in the public folder we’ll define everything we need to add new pages in the public part of the site.
Finally, the languages folder will contain files for translations of the voices of our plugin. This way the plugin can be used in different languages.
In the next WordPress tutorials we will see some practical examples of how to properly edit files to add some functionality.

