WordPress plugins allow you to add new features to blogs or e-commerce sites that are based on this technology. As we have already seen in article Develop a WordPress plugin – create the initial structure, if a plugin that fully meets our needs is not available, it is possible to create its structure in a few clicks. However, we need to populate it! A first step is to define a settings page that manages variables that our plugin will use.
In this article we will analyze where to insert the code to generate the settings page and how to save the settings that the user will provide during the configuration phase.
Plugin Preparation
For those who have not yet read article Develop a WordPress plugin – create the initial structure, we briefly report here the main steps to be performed.
First of all you will have to connect to WordPress Plugin Boilerplate Generator website. Filling in the form with the required information, the software will download on your pc a zipper containing the structure of the new plugin. The main functions to install it on a WordPress site are already included!
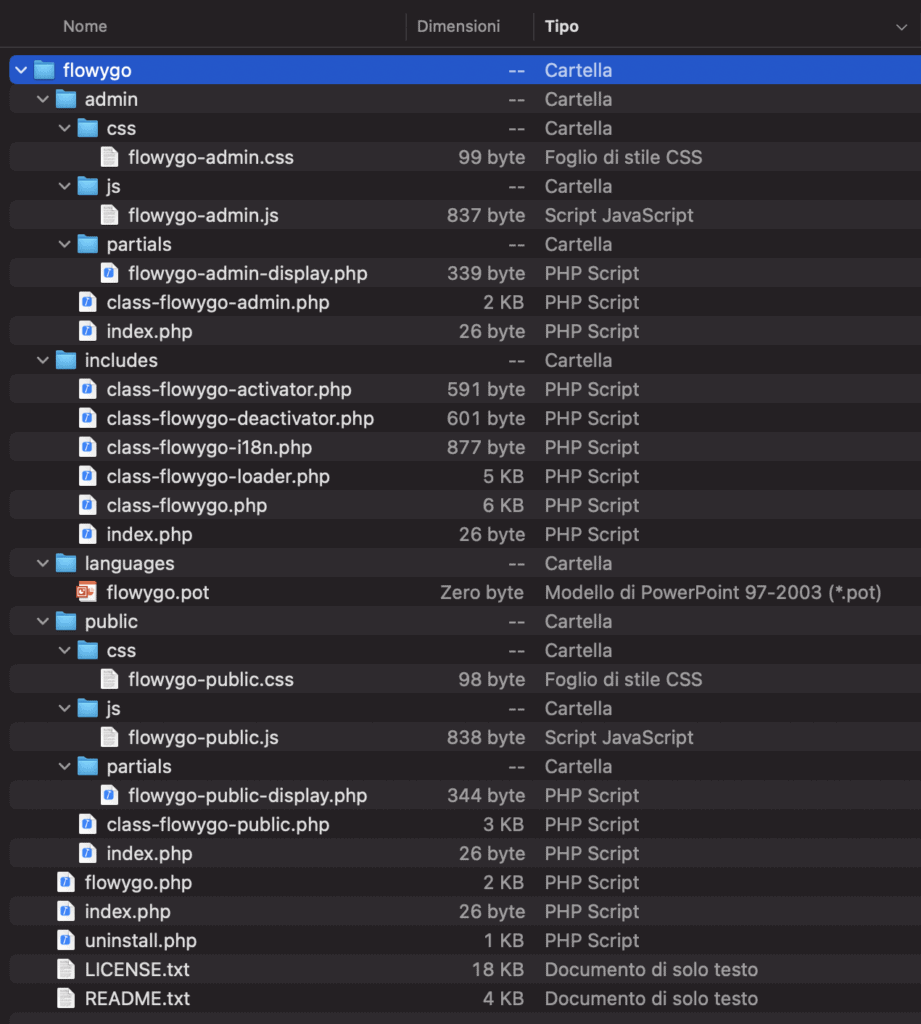
The structure we will use for this tutorial is the following.

The structure is quite articulated but at the same time well structured to insert in a simple and fast way the functions we’ll need. Let’s find out how.
Parameters definition
Before even developing the settings page, you need to identify what options will be defined by the site administrator. This step is beyond the scope of the tutorial because it depends a lot on the project you are working on. For example, it could be useful to set a duration expressed in days for the validity of a quiz or a post made by registered users. Some plugins, especially the paid ones, require the insertion of some credentials for the activation of advanced features or the use of a remote service. In this case you may be asked for a text field to enter a token or for login credentials (username and password). You can certainly take inspiration from already available plugins to better understand your needs.
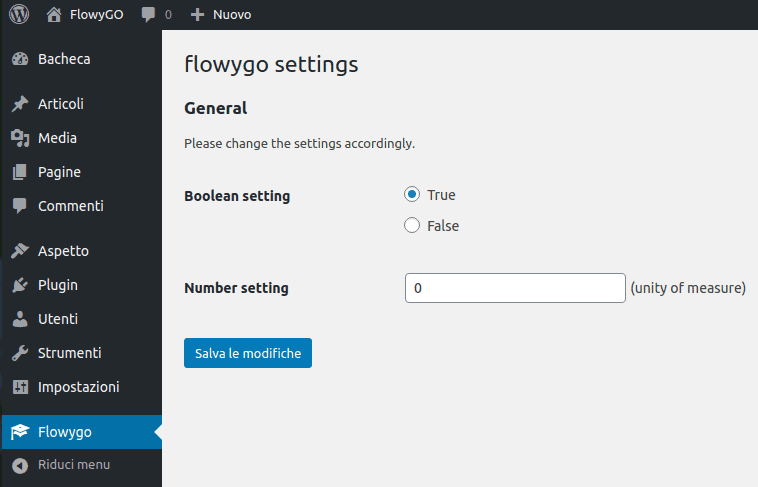
Once we have defined the parameters of our plugin settings, we can start creating the page that will be used to display the related form. In this example we are going to insert a couple of fields. Obviously, depending on plugin complexity, settings page could become much more articulated.
Let’s define, then, the parameters of our plugin. In our example we’ll insert a boolean field and a numeric field. Open the file class-flowygo-admin.php (in the admin folder) and add a variable called option_name. Its value will be used as a suffix for the parameters and functions we will use. The advice is to add it just before the function __construct.
/**
 * The options name to be used in this plugin
 *
 * @since  	1.0.0
 * @access 	private
 * @var  	string 		$option_name 	Option name of this plugin
*/
private $option_name = 'flowygo_setting';
Let’s create a new public function for registering settings variables. Below is the code of the function named register_flowygo_plugin_settings.
/**
 * Register the setting parameters
 *
 * @since  	1.0.0
 * @access 	public
*/
public function register_flowygo_plugin_settings() {
        // Add a General section
		add_settings_section(
			$this->option_name. '_general',
			__( 'General', 'flowygo' ),
			array( $this, $this->option_name . '_general_cb' ),
			$this->plugin_name
		);
		// Add a boolean field
		add_settings_field(
			$this->option_name . '_bool',
			__( 'Boolean setting', 'flowygo' ),
			array( $this, $this->option_name . '_bool_cb' ),
			$this->plugin_name,
			$this->option_name . '_general',
			array( 'label_for' => $this->option_name . '_bool' )
		);
		// Add a numeric field
		add_settings_field(
			$this->option_name . '_number',
			__( 'Number setting', 'flowygo' ),
			array( $this, $this->option_name . '_number_cb' ),
			$this->plugin_name,
			$this->option_name . '_general',
			array( 'label_for' => $this->option_name . '_number' )
		);
		// Register the boolean field
		register_setting( $this->plugin_name, $this->option_name . '_bool', array( $this, $this->option_name . '_sanitize_bool' ) );
		// Register the numeric field
		register_setting( $this->plugin_name, $this->option_name . '_number', 'integer' );
	}
The first function add_settings_section is used to insert a general description in settings page. Differently, the function add_setting_field is used to define a settings field of our plugin. In detail, the first parameter is the concatenation of option_name variable with a string of our choice. In this way we avoid conflicts on options names between our plugin and the ones we will use in the site.
The second parameter defines the title that will be shown on the settings page.
The third parameter is the callback function that will be called to display in an appropriate way the field to be filled. We will see later how to write them.
Finally the last parameters define the name of the settings page, the section they belong to and the parameters passed for rendering.
In order to display them correctly in the settings page, we have to use the register_setting function for each previously defined field. The parameters passed to this function are the name of the plugin, the name of the previously defined field and the arguments used to determine the data type or the function to sanitize the submitted values.
Settings Callbacks
As we have seen in the previous section, for each field that we define we need to insert callback functions used to generate the relative html code. We add these functions in the file class-flowygo-admin.php.
Let’s start with the function to generate the section text. In this case the function will print a simple message. You can obviously change the type of message to your liking as well as its layout. The code of the function flowygo_setting_general_cb is shown below.
/**
 * Render the text for the general section
 *
 * @since  	1.0.0
 * @access 	public
*/
public function flowygo_setting_general_cb() {
		echo '<p>' . __( 'Please change the settings accordingly.', 'flowygo' ) . '</p>';
	}
For the numeric field, the function must instead display an input of this type. In order to show also the previously saved value, the function get_option must be called. This function allows to retrieve the value saved to the database for the option identified by the name passed as parameter.
/**
 * Render the number input for this plugin
 *
 * @since  1.0.0
 * @access public
 */
public function flowygo_setting_number_cb() {
		$val = get_option( $this->option_name . '_number' );
		echo '<input type="text" name="' . $this->option_name . '_number' . '" id="' . $this->option_name . '_number' . '" value="' . $val . '"> ' . __( '(unity of measure)', 'flowygo' );
	}
A bit more complex is the case of boolean values. In this case we will use a radio button to display the two options. The first statement will retrieve the value from db. Then we’ll use the checked function, provided by WordPress, to select the previously saved value. Here is the code.
/**
 * Render the radio input field for boolean option
 *
 * @since  1.0.0
 * @access public
*/
public function flowygo_setting_bool_cb() {
	$val = get_option( $this->option_name . '_bool' );
	?>
		<fieldset>
			<label>
				<input type="radio" name="<?php echo $this->option_name . '_bool' ?>" id="<?php echo $this->option_name . '_bool' ?>" value="true" <?php checked( $val, 'true' ); ?>>
				<?php _e( 'True', 'flowygo' ); ?>
			</label>
			<br>
			<label>
				<input type="radio" name="<?php echo $this->option_name . '_bool' ?>" value="false" <?php checked( $val, 'false' ); ?>>
				<?php _e( 'False', 'flowygo' ); ?>
			</label>
		</fieldset>
	<?php
}
The last function we need to insert is the one related to saving the values of the radio button. Let’s insert a function called flowygo_setting_sanitize_bool, that will allow to save only certain values in the database. This is especially useful when dealing with options that are limited to specific values. In our case we will only accept two values: true and false. The function will check if the passed value belongs to the defined set. If true, the value will be saved to the database, otherwise it will be discarded.
Creating the settings page
At this point we have defined the parameters of our plugin and how they should be displayed. All that remains is to insert the relative page.
As a first step we modify the file flowygo-admin-display.php that we find in the path admin/partials. To display all our options we simply need to insert the following portion of code at the end of the file.
<div class="wrap">
    <h2><?php echo esc_html( get_admin_page_title() ); ?></h2>
    <form action="options.php" method="post">
        <?php
            settings_errors();
            settings_fields( $this->plugin_name );
            do_settings_sections( $this->plugin_name );
            submit_button(); ?>
    </form>
</div>
A few functions provided by WordPress will include the previously defined fields and a button to save them. In particular, the settings_errors function will display informational messages. For example, it will warn us if the changes have been saved correctly or if an error has occurred. The settings_fields and do_settings_sections functions will display the previously defined fields and sections. Finally, the submit_button function will insert a button to save the options entered by the user.
Adding the menu to the administrator panel
The last step is to insert our settings page in the administrator panel. To do this we must first define a global variable to manage the path properly. We insert in the main flowygo.php file the following line of code just after the plugin version definition ( define( ‘FLOWYGO_VERSION’, ‘1.0.0’ ) ; )
!defined('FLOWYGO_PATH') && define('FLOWYGO_PATH', plugin_dir_path( __FILE__ )); Let’s go back to the class-flowygo-admin.php file and add a function that includes the flowygo-admin-display.php file when initializing the plugin.
/**
 * Include the setting page
 *
 * @since  1.0.0
 * @access public
*/
function flowygo_init(){
	if ( ! current_user_can( 'manage_options' ) ) {
		return;
	}
	include FLOWYGO_PATH . 'admin/partials/flowygo-admin-display.php' ;

}
We can then add the menu page as shown below. To customize the associated icon in the sidebar of the admin panel, simply pass the name of an icon provided by WordPress as the last parameter. You can find the gallery of available icons in the official documentation.
public function flowygo_plugin_setup_menu(){
		add_menu_page( 'flowygo settings', 'Flowygo', 'manage_options', 'flowygo', array($this, 'flowygo_init'), 'dashicons-welcome-learn-more' );

	}
All that remains is to instruct WordPress during plugin activation what functions to use to add the options and the menu page. Let’s open the file class-flowygo.php in the includes folder and add the following lines of code inside the define_admin_hooks function.
$this->loader->add_action( 'admin_init', $plugin_admin, 'register_flowygo_plugin_settings' );
$this->loader->add_action( 'admin_menu', $plugin_admin, 'flowygo_plugin_setup_menu');
Plugin installation
Once you have made all the changes described above, all that remains is to load the plugin. In order to do that we have to compress the folder into a zipper. After that, just go to the plugin section, upload the zipper created and activate it. After activation we’ll see the menu of our plugin appear with the chosen icon. Selecting it we’ll see the settings page where we’ll save our preferences.


