Everyone needs to edit images at one time or another. There are a number of software programs, both free and paid, that allow you to achieve amazing results. From the more professional ones like Photoshop to the free ones found online. The idea of the latter is sometimes very simple. You upload the image, choose the effect you want to apply and finally download the final result. But how do they do it? Actually many effects are not difficult to achieve if you use the right libraries. OpenCV, a Python Computer Vision library, allows you to manipulate images in real-time. You can, for example, turn a photo into a sketch or convert it to grayscale. Of course, OpenCV allows this and much more.
Lately we’ve also been exploring Streamlit, an open-source framework entirely in Python that allows you to quickly build data-driven web applications and dashboards without the need for front-end web development skills. You can read articles Streamlit: Build a Web App in minutes and Streamlit: how to improve the user experience of a web app to get an idea of what can be done in very little time and focusing primarily on the data we want to manage and/or analyze.
In this article we will use Streamlit to build an app that allows you to upload a photo and choose the effect to apply using the OpenCV library.
Prerequisites
You must, before you start developing, install Streamlit and OpenCV. To install Streamlit you can refer to the Streamlit: Build a Web App in minutes tutorial. To install OpenCV you can follow the instructions found in the official documentation. If you use Anaconda and the environment created in the previous tutorials, simply open the Terminal of the environment and install OpenCV with the following command.
pip install opencv-python Create in the folder of your project a file photo_converter.py where you will insert the code that we will illustrate below. At this point launch Streamlit with the following command.
streamlit run photo_converter.py Since the file is initially empty the browser page will only have the menu at the top right. Remember to select ‘Run on save’ in the Settings menu so that every time you make a change to the code it will be automatically reflected in the web app.
Let’s also start importing the necessary libraries by inserting the following code.
#Import libraries
import streamlit as st
import numpy as np
import cv2
from  PIL import Image, ImageEnhance
Customize the app layout
In the main application interface, we start by adding a header using st.markdown() and also a logo. The reason we choose st.markdown() instead of st.title() is that we can use CSS to stylize it and make it more eye-catching.
image = Image.open(r'...\Insights_Bees_logo.png') #Brand logo image (optional)

#Create two columns with different width
col1, col2 = st.columns( [0.8, 0.2])
with col1:               # To display the header text using css style
    st.markdown(""" <style> .font {
    font-size:35px ; font-family: 'Cooper Black'; color: #FF9633;}
    </style> """, unsafe_allow_html=True)
    st.markdown('<p class="font">Upload your photo here...</p>', unsafe_allow_html=True)

with col2:               # To display brand logo
    st.image(image,  width=150)
We also add a header and expander in the sidebar to provide more information about the application.
#Add a header and expander in side bar
st.sidebar.markdown('<p class="font">My First Photo Converter App</p>', unsafe_allow_html=True)
with st.sidebar.expander("About the App"):
     st.write("""
        Use this simple app to convert your favorite photo to a pencil sketch, a grayscale image or an image with blurring effect.  \n  \nThis app was created by Sharone Li as a side project to learn Streamlit and computer vision. Hope you enjoy!
     """)
Upload images
We need to add a file uploader, in the main interface of the app, so that users can upload their photos either by drag-and-drop or by browsing the contents of their hard disk. We therefore use the st.file_uploader() widget specifying the image types that are accepted (e.g., JPG, PNG, JPEG). This prevents a user from uploading files that are not supported by the application.
#Add file uploader to allow users to upload photos
uploaded_file = st.file_uploader("", type=['jpg','png','jpeg'])
View images before and after transformation
Once the user uploads a photo, we want to show the original and converted image next to each other. Therefore, we create two columns with the same width under the file uploader, one for ‘before’ and the other for ‘after’. Be sure to put everything inside the ‘if uploaded_file is not None:’ statement. Otherwise, the application will display an error message if it doesn’t find any images to convert.
#Add 'before' and 'after' columns
if uploaded_file is not None:
    image = Image.open(uploaded_file)

    col1, col2 = st.columns( [0.5, 0.5])
    with col1:
        st.markdown('<p style="text-align: center;">Before</p>',unsafe_allow_html=True)
        st.image(image,width=300)

    with col2:
        st.markdown('<p style="text-align: center;">After</p>',unsafe_allow_html=True)
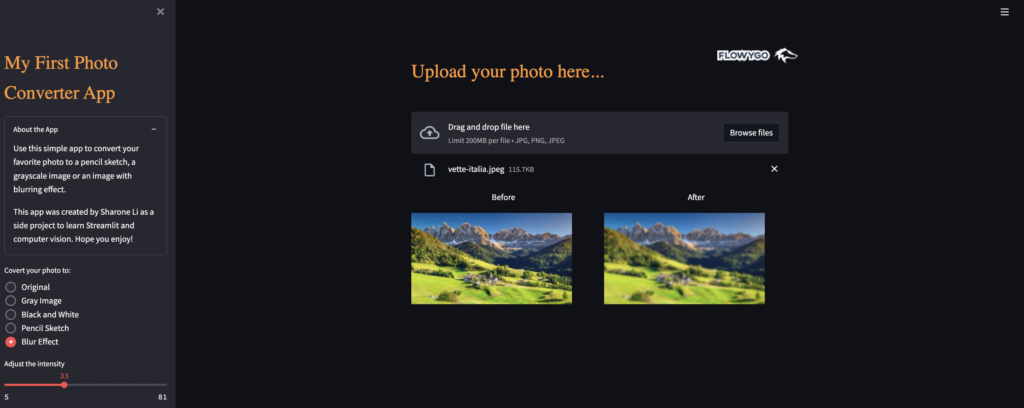
The application will show up as follows.

Convert photos with OpenCV
Up to this moment the application allows only to load the image and show it.
Now we want to display in the second column col2 the converted image according to the choice made by the user. How can we achieve this?
We need, therefore, to create a filter or a single selection box to allow users to specify the conversion they want to apply. To keep the main interface clean and focused on the image, let’s add this filter to the sidebar. Simply add the following line of code within the ‘if uploaded_file is not None’ branch. If you want the filter to always appear even when an image has not been uploaded just insert it before the if statement.
filter = st.sidebar.radio('Covert your photo to:', ['Original','Gray Image', 'Black and White', 'Pencil Sketch', 'Blur Effect']) To process the choice made by the user, we need to indicate within the code where to pass the filter values and what action to trigger. We, therefore, need to add some conditional statements under col2 to achieve this.
In the following code, we use if-else conditional statements to convert the images to different user-selected formats. For each choice, we’ll use different OpenCV functions to convert the image to the desired format and display the result using st.image().
#Add conditional statements to take the user input values
    with col2:
        st.markdown('<p style="text-align: center;">After</p>',unsafe_allow_html=True)
        filter = st.sidebar.radio('Covert your photo to:', ['Original','Gray Image','Black and White', 'Pencil Sketch', 'Blur Effect'])
        if filter == 'Gray Image':
                converted_img = np.array(image.convert('RGB'))
                gray_scale = cv2.cvtColor(converted_img, cv2.COLOR_RGB2GRAY)
                st.image(gray_scale, width=300)
        elif filter == 'Black and White':
                converted_img = np.array(image.convert('RGB'))
                gray_scale = cv2.cvtColor(converted_img, cv2.COLOR_RGB2GRAY)
                slider = st.sidebar.slider('Adjust the intensity', 1, 255, 127, step=1)
                (thresh, blackAndWhiteImage) = cv2.threshold(gray_scale, slider, 255, cv2.THRESH_BINARY)
                st.image(blackAndWhiteImage, width=300)
        elif filter == 'Pencil Sketch':
                converted_img = np.array(image.convert('RGB'))
                gray_scale = cv2.cvtColor(converted_img, cv2.COLOR_RGB2GRAY)
                inv_gray = 255 - gray_scale
                slider = st.sidebar.slider('Adjust the intensity', 25, 255, 125, step=2)
                blur_image = cv2.GaussianBlur(inv_gray, (slider,slider), 0, 0)
                sketch = cv2.divide(gray_scale, 255 - blur_image, scale=256)
                st.image(sketch, width=300)
        elif filter == 'Blur Effect':
                converted_img = np.array(image.convert('RGB'))
                slider = st.sidebar.slider('Adjust the intensity', 5, 81, 33, step=2)
                converted_img = cv2.cvtColor(converted_img, cv2.COLOR_RGB2BGR)
                blur_image = cv2.GaussianBlur(converted_img, (slider,slider), 0, 0)
                st.image(blur_image, channels='BGR', width=300)
        else:
                st.image(image, width=300)
Let’s see in a little more detail how OpenCV works in different cases.
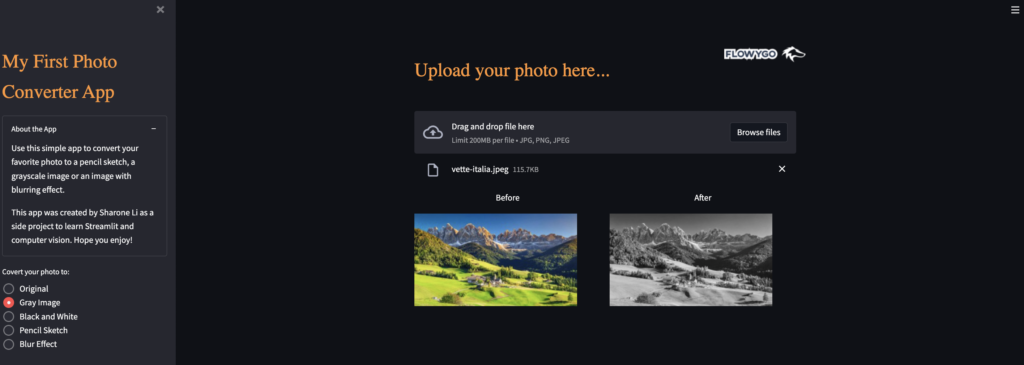
To convert an image to grayscale just use the cvtColor() function and specify that the color space conversion code is cv2.COLOR_BGR2GRAY.
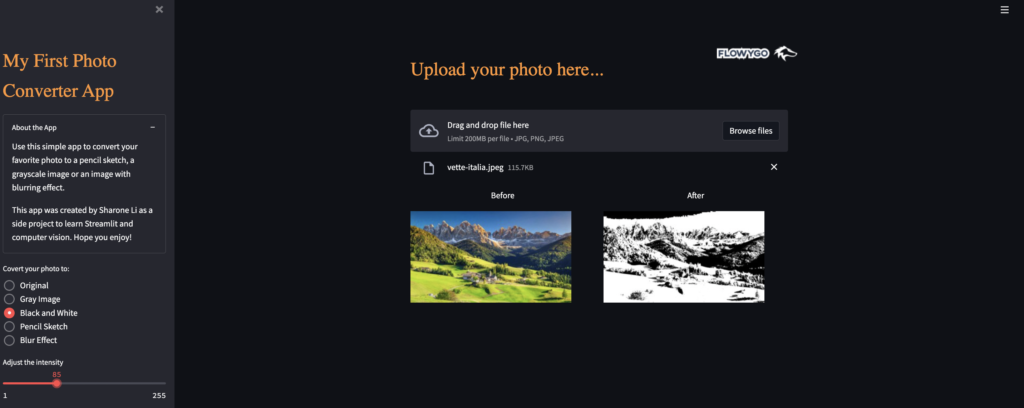
On the other hand, if the image is to be in black and white, we must first convert it to grayscale and then define a threshold to assign to each pixel the color white (value 255 if it is above threshold) or black (value 0 if it is below threshold). To let the user choose this threshold we create a scrolling widget.
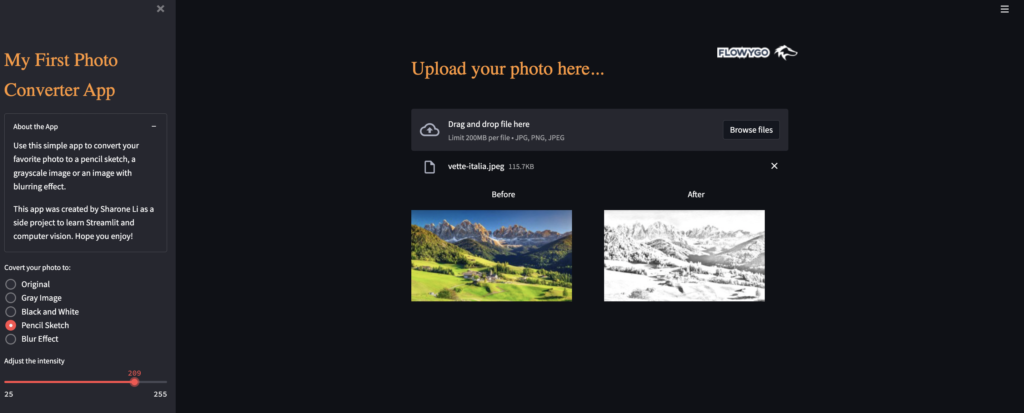
In order to get a pencil sketch, we first convert the image to grayscale and then basically invert it, making the black tones white and vice versa. Finally we apply the blur filter using the Gaussian Blur function (cv2.GaussianBlur). To customize the pencil sketch, we again insert a slider widget to select the size of the Gaussian kernel and adjust the blur accordingly. The default values are (125,125) for both height and width. It is also possible to use different values for the two parameters. Finally, we use the function cv2.divide to divide the pixels of the gray image with those of 255-blur_image. This returns an image that looks like a pencil drawing.
Finally, to blur an image, we first convert it to grayscale and then add the blur filter using the Gaussian Blur function (cv2.GaussianBlur). Again, we add a st.siderbar.slider() widget to allow the user to adjust the intensity of the blur.
Request feedback
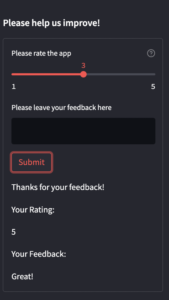
In conclusion, we make the application more “social” by adding a feedback section in the sidebar to collect user ratings and comments. We use the st.text_input() widget to allow users to submit comments and the st.slider() widget to assign a score on a scale of 1 to 5. We can then use st.form_submit_button() and st.form() to batch insert widgets together and send widget values with the click of a button, which will only trigger a single repetition of the entire app.
#Add a feedback section in the sidebar
st.sidebar.title(' ') #Used to create some space between the filter widget and the comments section
st.sidebar.markdown(' ') #Used to create some space between the filter widget and the comments section
st.sidebar.subheader('Please help us improve!')
with st.sidebar.form(key='columns_in_form',clear_on_submit=True): #set clear_on_submit=True so that the form will be reset/cleared once it's submitted
    rating=st.slider("Please rate the app", min_value=1, max_value=5, value=3,help='Drag the slider to rate the app. This is a 1-5 rating scale where 5 is the highest rating')
    text=st.text_input(label='Please leave your feedback here')
    submitted = st.form_submit_button('Submit')
    if submitted:
      st.write('Thanks for your feedback!')
      st.markdown('Your Rating:')
      st.markdown(rating)
      st.markdown('Your Feedback:')
      st.markdown(text)
In this case the feedback will be displayed in the sidebar. Using other Python libraries you can send it via email or save it where you think it is most appropriate.
All the code is available in the github repository. If you want to use the app you can connect to Streamlit Cloud.


