
In the previous articles, Gradio: web applications in python for AI [part1] and Gradio: web applications in python for AI [part2], we saw an introduction to Gradio and how to customize our applications to make them more responsive and suited to our needs. In this article, we will address more advanced topics to complete the picture of the functionality provided by the library. In particular, we will see how to manage caching, flagging, authentication, states, and loading data via files. Two examples of real applications will also be shown to fully understand the potential of Gradio. Finally, we will provide some information on how to deploy our projects.
Configurations
Gradio applications are configured in the launch() process. However, some configuration can be done through environment variables.
To make the application accessible on the local network, you must set the value “0.0.0.0” in the server_name parameter in gradio.Interface.launch() . This value can also be set through the environment variable GRADIO_SERVER_NAME. If no parameter is passed, the value 127.0.0.1 will be used by default.
Flagging
Flagging allows you to collect data about the users who use your application/model, particularly where the application behaves unexpectedly. Gradio has a simple flagging method.
By including a Flag button in each interface, the user can send data to the location where the application is running.
Gradio allows four parameters in the gradio.Interface() component that define how flagging works. The parameters include allow_flagging, flagging_options, flagging_dir, and flagging_callback.
allow_flagging is manual by default and samples are flagged when the user clicks the Flag button. You can use flagging_dir = “path/to/store,” specifying the directory for storing log data. Otherwise, the logs will be stored in a new directory at the location where the application is launched.
We can add flagging to the Altair visualization application, as shown below.
					import numpy as np
import pandas as pd

import gradio as gr
import altair as alt

from math import log
import numpy as np
import pandas as pd


def gdp_change(r, year, country, smoothen):
    years = ['1850', '1900', '1950', '2000', '2050']
    m = years.index(year)
    start_day = 1* m
    final_day = 1* (m + 1)
    x = np.arange(start_day, final_day + 1)
    pop_count = {"USA": 350, "Canada": 40, "Mexico": 300, "UK": 120}
    if smoothen:
        r = log(r)
    df = pd.DataFrame({'day': x})
    df[country] = ( x ** (r) * (pop_count[country] + 1))
    df['country'] = df[country].values

    return alt.Chart(df).mark_bar().encode(
            x='day',
            y= 'country').properties(width=550)

inputs = [
        gr.Slider(0.1, 1, 0.3,step = 0.001, label="R"),
        gr.Dropdown(['1850', '1900', '1950', '2000', '2050'], label="year"),
        gr.Radio(["USA", "Canada", "Mexico", "UK"], label="Countries", ),
        gr.Checkbox(label="Log of GDP Growth Rate?"),
    ]
outputs = gr.Plot()


demo = gr.Interface(fn=gdp_change, inputs=inputs, outputs=outputs, allow_flagging="manual", flagging_options=["No plot shown", "Wrong axis", "Other"])

demo.launch()
For parameter options, see the Gradio documentation.
Caching
Whenever the application is updated, you will lose the examples from the server. You can specify cache_examples = True in the main Gradio interface, i.e., gradio.Interface() after defining the examples.
					import gradio as gra
def user_greeting(name):
    return "Hi! " + name + " Welcome to your first Gradio application!😎"

app =  gra.Interface(fn = user_greeting, inputs="text", outputs="text", examples = ["Zenith", "Antoinne", "Amelia", "Johanna"], cache_examples = True)
app.launch()
Application authentication
When launching a Gradio application, an authentication method can be defined by specifying the auth parameter. If auth is passed, a username and password (or a username-password tuple list) will be required to access the interface.
You can also add an auth_message to guide the user on what to include.
					import gradio as gr

def data_display(input_img):
    return input_img

demo = gr.Interface(data_display, gr.Dataframe(), "matrix")
demo.launch(auth=("gradio", "test@1234"), auth_message="Try this")
Adding status to applications
Statefullness in Gradio can be realized in both global and session states.
Global state
Global state in blocks has similar functionality to that of the interface. Any variable or data defined outside a function is accessible to all functions.
In the track_gdp example below, the gdps variable is shared by all users. Users accessing the application will see their scores added to the list.
					import gradio as gr

gdps = []

def track_gdp(gdp):
    gdps.append(gdp)
    top_gdps = sorted(gdps, reverse=True)[:3]
    return top_gdps

demo = gr.Interface(
    track_gdp,
    gr.Number(label="gdp"),
    gr.JSON(label="Top gdps")
)
demo.launch()
Session state
Gradio also supports session state, in which data persist between multiple submissions within a page session and in block applications. For session state:
- Define a gradio.State() object.
- Place the State object in the event listener as input and output.
- In the event listener function, include the variable in the input parameter and return value.
To demonstrate the session state of an application, we will use the hangman game.
					import gradio as gr
import random

secret_word = "machine"

with gr.Blocks() as demo:
    used_letters_var = gr.State([])
    with gr.Row() as row:
        with gr.Column():
            input_letter = gr.Textbox(label="Enter letter")
            btn = gr.Button("Guess Letter")
        with gr.Column():
            hangman = gr.Textbox(
                label="Hangman",
                value="_"*len(secret_word)
            )
            used_letters_box = gr.Textbox(label="Used Letters")

    def guess_letter(letter, used_letters):
        used_letters.append(letter)
        answer = "".join([
            (letter if letter in used_letters else "_")
            for letter in secret_word
        ])
        return {
            used_letters_var: used_letters,
            used_letters_box: ", ".join(used_letters),
            hangman: answer
        }
    btn.click(
        guess_letter,
        [input_letter, used_letters_var],
        [used_letters_var, used_letters_box, hangman]
        )
demo.launch()
You will notice that the session persists within the page, but if you load the app in a new tab or refresh the app, it will not share the “guessed” history.
Uploading and processing files
Many applications require the user to provide information in the form of files. In Gradio it is possible to upload and view any type of file, as well as to process their contents appropriately.
Uploading a single file
Let’s look at an example of loading an image.
					import numpy as np
import gradio as gr

def upload_image(input_img):

    return input_img

demo = gr.Interface(upload_image, gr.Image(width=400, height=300), "image")
demo.launch()
gradio.File() also allows you to upload generic files such as zipper files.
					from zipfile import ZipFile

import gradio as gr
from zipfile import ZipFile

def upload_file(file_obj):
    files = []
    with ZipFile(file_obj.name) as zfile:
        for zinfo in zfile.infolist():
            files.append(
                {
                    "name": zinfo.filename,
                }
            )
    return files


demo = gr.Interface(upload_file, "file", "json")

if __name__ == "__main__":
    demo.launch()
Uploading multiple files
To upload multiple files, add a file_count parameter, which specifies the number of files you can upload in a single session. In this example we will create an input to upload multiple files that will be used to create a zipper file.
					import os
from zipfile import ZipFile

import gradio as gr

def zip_files(files):
    with ZipFile("tmp.zip", "w") as zipObj:
        for idx, file in enumerate(files):
            zipObj.write(file.name, "file" + str(idx))
    return "tmp.zip"

demo = gr.Interface(
    zip_files,
    gr.File(file_count="multiple"),
    "file"
)

if __name__ == "__main__":
    demo.launch()
Uploading and processing data
When uploading files, you can define a function that preprocesses the data and returns an output of the preprocessed file. For example, you can change the hue of the image data.
					import numpy as np
import gradio as gr

def sepia_hue(input_img):
    sepia_filter = np.array([[.393, .769, .189],
                         [.349, .686, .168],
                         [.272, .534, .131]])
    sepia_hue_img = input_img.dot(sepia_filter.T)
    sepia_hue_img /= sepia_hue_img.max()
    return sepia_hue_img

demo = gr.Interface(sepia_hue, gr.Image(width=300, height=200), "image")
demo.launch()
Building an image classifier
Transformers offer APIs and tools to quickly download and train state-of-the-art pre-trained models. As shown below, you can easily create a classification application using transformers for images. We will use a pre-trained model from Google to classify a couple of images.
					import gradio as gr
#load your preffered model
demo = gr.load("google/vit-base-patch16-224", src="huggingface")

#launch
demo.launch()
For other transformer models, see the Huggingface documentation.
Using Huggingface to develop a chatbot
The creation of a chatbot is simplified by the use of pre-trained Hugging face templates. You need a tokenizer and a pre-trained conversational model, such as DialoGPT.
					from transformers import AutoModelForCausalLM, AutoTokenizer
import torch
#set up the model (large version of DialoGPT)
tokenizer = AutoTokenizer.from_pretrained("microsoft/DialoGPT-large")
model = AutoModelForCausalLM.from_pretrained("microsoft/DialoGPT-large")

#Defining a predict function

def predict(input, history=[]):
    # tokenize the new input sentence
    new_user_input_ids = tokenizer.encode(input + tokenizer.eos_token, return_tensors='pt')

    # append the new user input tokens to the chat history
    bot_input_ids = torch.cat([torch.LongTensor(history), new_user_input_ids], dim=-1)

    # generate a response
    history = model.generate(bot_input_ids, max_length=1000, pad_token_id=tokenizer.eos_token_id).tolist()

    # convert the tokens to text, and then split the responses into lines
    response = tokenizer.decode(history[0]).split("<|endoftext|>")
    response = [(response[i], response[i+1]) for i in range(0, len(response)-1, 2)]  # convert to tuples of list
    return response, history

#creating a gradio interface

import gradio as gr

demo = gr.Interface(fn=predict,
             inputs=["text", "state"],
             outputs=["chatbot", "state"])

demo.launch()
Application deployment
The Gradio package makes it easy to create a shareable GUI and public link for the model. This is true as long as the model runs in your local environment. But when you need a long-term hosted solution, you need to look elsewhere.
This is where hosting services such as Heroku and HuggingFace spaces come in.
Heroku
Deploying a Gradio application in Heroku follows five steps:
- Create the application (app.py) and store it in a new directory.
- Write the requirements.txt file.
You will need, of course, a Heroku account and optionally, for convenience, the Heroku CLI. Create a Heroku account and download the CLI, if you have not already done so:
- Create a setup.sh file. For the application to run properly, make sure it is served on the correct URL and port. Add export GRADIO_SERVER_NAME=0.0.0.0 and export GRADIO_SERVER_PORT=”$PORT” to the setup.sh file.
- Create a Procfile. The Procfile specifies the commands to be executed to start the Gradio application. There are only two commands: running the bash script and starting the application. So your Heroku Procfile looks like the web: source setup.sh && python app.py
- Deploy. Once this is done, you can proceed with the usual process of deploying to Heroku.
Huggingface
Create a user account at https://huggingface.co/. Go to Spaces in the navigation bar and create a new space. Provide all the necessary information.
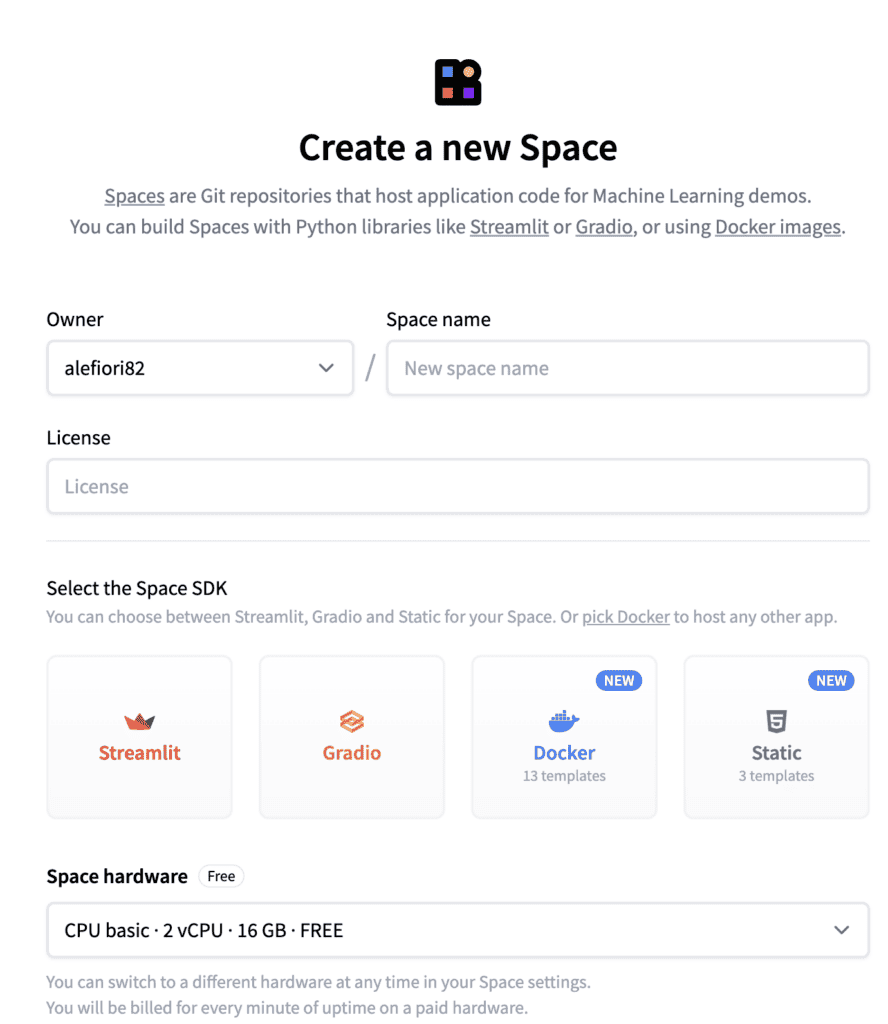
A link to a repo will now be created. Copy the link into the command prompt. For example, you might get a link as shown below, but it might be different depending on your details.
git clone https://huggingface.co/spaces/alefiori82/Gradio_machine_learning
A new folder (Gradio_machine_learning) will be created.
- Make a copy of the files needed to run the Gradio application, such as app.py, requirements.txt in this new folder.
- In the terminal, run the following commands, replacing the respective names with those in your workspace.
					cd Gradio_Machine_Learning
git add .
git commit -m "first commit"
git push
You will be prompted to enter your Huggingface credentials. If you have met all the requirements, go to your spaces and click on your space. You should see the application running.


